Showing posts with label DIY. Show all posts

Sunday, November 7, 2010

Love Always Guestbook

Back in the day {September 2010}, Sarah over at truly smitten posted about a guestbook idea she had seen in the fall 2010 issue of Martha Stewart Weddings. In case you hadn't seen it yet, I thought I would pass along this guest book idea {you can still download the pdf to diy!}.

Below is an image of the template which allows for personalization of your names and wedding date. Then, simply print and display at your wedding for guests to sign!

After your wedding, frame the signed "love always" poster and display it for years and years to come as a little memento from your special day.

What are you having your guests sign on your wedding day?!

Photos via Martha Stewart Weddings via truly smitten.

Friday, September 25, 2009

Did It Herself

You can, and should, make your own bouquets & boutonnières for your wedding. There, I said it. I wish I would have done it and you shouldn't have the same regret. So listen up my little crafty readers and see how one bride {Brittni from papernstitch} did it herself.

A few simple raw {and beautiful!} materials were ordered from Whole Foods, assembled {above} and turned into a stunning bouquet {below}.
Do it the night before or the morning of and enlist your friends & bridesmaids to help. To be honest, I don't think that you could possibly "mess it up." Its not rocket science, but it probably helps to have a dry test run a month or so before the wedding!
You can see the complete step-by-step instructions/tutorial here and her wedding post here at 100 layer cake. Get to it!

Monday, July 6, 2009

Wrap It

My friend Debbie joined my Mom and I at the lake this weekend over the fourth. As I previously mentioned, Debbie's now fiance finally got proposed and they are now planning a June destination wedding(!!!!). My Mommy and I couldn't be happier and there was an abundance of wedding planning talk this weekend. Mommy echoed my thoughts that favors are quite unnecessary but that people "always love a good mint." Thus, when I came across these Minty Makeovers from the Hip Hostess Blog I just had to share:Cookies are always nice too. These, cookie favors are wrapped with tissue, parchment and gingham ribbon. They would make a nice addition to any candy buffet or place setting.

You can find the DIY tutorial for those cute little buttons here.p.s. ideas shown as found on the artsy bride via this post. if you aren't reading the blog of the artsy bride, you should be.

Wednesday, June 24, 2009

Bridal Party Signage

Just a cute little piece of signage that, although not important or necessary, would make a lovely addition to the brides door while she is getting ready throughout the day.
Perhaps a crafty bridesmaid could make this for her friend since not too many brides will have time for DIY projects like this!

as seen on: the brides cafe photo by: sweet monday photo

Wednesday, May 20, 2009

Pew Cards

This post over at {my other little blog} Penned & Pretty was so loved that its getting posted here too, because I know you will all adore this idea.If you are looking for an easy and sneaky way to make sure that your loved ones get a front row seat during your ceremony, include these little {bride's side & groom's side} pew cards in the wedding invitations you send your closest family members. On the back, simply write a little with instructions to bring the pew card to the ceremony and hand it to an usher to obtain their VIP seating as you say your vows. Now that makes everyone happy, doesn't it?
found via: Twig & Thistle here

Wednesday, March 4, 2009

How I Tied the Knot: The Programs

There is one more part of How I Tied the Knot: The Ceremony that I still need to share with you, our programs!
A lot of time and thought was put into our programs. I wanted to give our guests something to read and enjoy both before and during the ceremony. And, naturally, they had to be beautiful.

Here are the quick & dirty details: April Foster obtained the purple cardstock that we creased in half to make the cover. She also formatted and printed the programs. {Thanks, April!} April created a 2 inch by 2 inch square logo that we affixed to the outside of the program. We incorporated our monogram on the logo square to say, "The Marriage Ceremony Uniting" Jessica & Chris. We also included the date and name of the church at the bottom of the logo. The ribbon was 1/2 inch ribbon bought from Michaels. It was weaved through two holes and bound our little program together.

Crafting the program for your wedding ceremony can be tedious, so here is a little glimpse of ours. Hopefully it will help you put together yours!

Page 1: About the Couple
Once upon a time, there lived a little girl named Jessica.
An only child, she was certainly the apple of her parents’ eyes.
She spent her summers at the lake and attended various summer camps.
In high school, she was quite the cross-country runner.
When it came time for her to spread her wings and fly,
she went to XX University in Indianapolis, Indiana.
It was there that she joined Delta Gamma
and gained the sisters she never had.

There once was a little boy named Chris, the youngest of four.
He soon found his dimple could get him out of any trouble he caused.


His childhood was spent playing sports and travelling with his family.
At XX High School he became a stand out golfer.
A short time later his golf skills took him to
the University of XX on a golf scholarship.

On a hot summer night on the ninth of September in 2005,
the boy and the girl both happened to attend the same
Rascal Flatts concert in Cincinnati, Ohio.
After the concert the girl and her friend
needed directions to the local bar.
They approached the boy and his friends,
Only to find out they just so happened to need a ride to that same bar.
They introduced themselves, and the boy flashed his dimple to the girl.

From that moment on, as fate would have it, they were inseparable
Halloween, 2005, was the day that they officially started dating,
even though they knew way before then that they were together.
On Halloween, 2007, the boy got down on one knee
and asked the girl, the apple of his eye, to marry him.
She said yes.

That concert is the reason that the boy and the girl
are standing before each other today,
just waiting to finally become husband and wife.

Today they will recite their vows.

Today is the first day of the rest of their lives together.


Page 2: The Ceremony {middle page: opposite page 3}
Prelude Instrumental

Seating of the mothers Jesu, joy of man’s desire: Bach

Processional Cannon in D: Pachelbel

Entrance of the Bride Trumpet voluntary: Purcell
Escorted by her uncle, Mr. Scott XX


Opening prayer
Old Testament reading Genesis 2: 18-24
Read by: Mr. Randy XX, Brother of the Groom

Responsorial Psalm Psalm 103:1-2, 8, 13, 17-18a
Response: The Lord is Kind and Merciful
Read by: Mrs. Tina XX, Sister of the Groom

New Testament Reading 1 Corinthians 12:31 – 13:8a
Read By: Mr. Mike XX, Brother of the Groom

Alleluia Verse Celtic Alleluia GC 258

Gospel Reading John 15: 9-12
Father Clifford Vogelsang

Homily Father Clifford Vogelsang

Exchanging of vows

Exchanging of Rings

Lighting of the unity candle How beautiful – T. Paris

Prayer of the Faithful
Response: Lord hear our prayer
Read by: Mrs. Jill XX, Aunt of the Bride

Pronouncement of Marriage

Final Blessing
Response: Amen

Recessional Praise Processional: M. Dickerson
Hornpipe: Handel

Dismissal Instrumental


Page 3: The Wedding Party {middle page: opposite page 2}

We listed out the names of the members of our bridal party {including parents, GM and BM, Flower Girls & Ushers, Officiant and Readers} and how we knew them {example: College Friend of the Groom}.

Page 4: Our Thanks

We took a page in the program to thank our bridal party, parents and guests for sharing our special day with us. This was also the section in the program where we chose to recognize and honor our family members that could not be physically present on our wedding day.
The Bride & Groom would like to thank:

Tommy XX
For standing beside us on the most important day of our lives,
It means so much to us to have you as the best man.

Debbie XX
Your friendship has meant more to us than you will ever know.
We couldn’t have asked for a better maid of honor.

Our Bridesmaids and Groomsmen
For all the memories you have shared with the two of us,
we couldn’t imagine this day without each of you.

Our Flower Girls and Ushers
As you know, you are the cutest flower girls and ushers
That A Bride & Groom could ever ask for. We love you.

Our Officiant, Readers, & Musician
For your participation in our beautiful ceremony, we thank you.

Our Friends and Family
Once in a while, right in the middle of an ordinary life,
love gives us a fairy tale…thank you for being a part of ours.

In Memory
To those who could not be present today,
but are certainly looking down on us.

Mr. Gary XX
Mr. & Mrs. Gustave XX and Mr. & Mrs. Robert XX
Mr. and Mrs. David XX and Mr. & Mrs. Fred XX
Their presence is felt in our hearts and is represented by the
three flames in the remembrance candle placed near the altar.

And last but not least,
Our Parents
Who loved us and raised us and who gave us all the support in the world.
We love you more than words can express.

I hope that this little glimpse of our program can be of help to those of you looking for a little guidance with your program!

Lesson Learned #28: Don't budget/plan to make one program per person. The men never take one and you'll be left with more extras than you know what to do with!

Lesson Learned #29: Kinkos can staple/hole punch/score/fold your programs for you all for just a couple dollars. Kinkos punched two holes in each of our 100 programs for $7. Best $7 I ever spent.

note: names and personal info have been removed/changed for privacy purposes.
Wednesday, December 17, 2008

Wooden Signs

I just had to share these two signs that I came across recently. They are adorable, I pinky promise.
The picture below {almost} makes me wish that Chris and I got married outside in a completely rustic setting. I have seen "wedding" signs before, but "nuptials" is much more romantic.
The next two signs were featured on Style Me Pretty not too long ago. I did a double take after seeing these signs for the first time...that's how cute they are. The first sign is informational while the second is witty. Just a little detail that your guests surely wouldn't be able to forget!
If you are having an outdoor wedding or reception, wooden signs can be a relatively small detail that your guests will adore.

photos: robert sukrachand and style me pretty

Thursday, December 11, 2008

How I Tied the Knot: Blurb Guest Book

Previously in the post, tying the knot: reception details, I shared some of my favorite pictures of details from reception. Now, it's time to let you all in on the details behind one of our favorite details, the blurb book and lessons that I learned from that aspect of our wedding day. And, of course, some pretty pictures to display along the way!


I knew early in the planning process that I wanted to have a blurb book serve as our guest book. I incorporated our engagement photos into the layout along with pages left blank for our guests to sign and I couldn't have been happier with how the book turned out. Our guests loved seeing our engagement pictures and the book is now displayed on one of our end tables. So here's how I made ours:

I went with the standard landscape 20 page hard copy book with the dust jacket cover. We chose an image for the dust jacket cover and then customized the cover with our new "married couple" name and the date of our wedding. The spine reflected our new "married couple" name and "The Guestbook."
There were a number of photo layouts to choose from, but I stuck with just three photo layouts, which were displayed on every left-hand page of the book. The four picture layout was the layout that I used the most.
But the full page spreads were my favorite.
I incorporated this three picture layout from time to time.
In every layout with multiple pictures, I attempted to keep the pictures to either all color pictures or all black and white pictures...I just felt like it looked better.

Every right hand side of the blurb layout was blank, except for a light border. With 150 guests at our wedding, I assumed that 1 person per couple would sign our guest book and write a short little note to us. Therefore, I needed room for about 75 couples. Spacing it out I figured out that there was room on each page for about 8 people (couples) to sign/ write notes. Thus, I needed about 9 blank pages. So we went with a 20 page book (1 title page, 9 left pages with pictures, 9 blank right pages for writing/signing, and one final closing page). It worked out perfectly.

Here's a picture from our wedding day of the blurb guest book in action.
Lesson Learned #14: If you opt for a traditional plain guest book filled with lined pages, your guests will have as much fun signing it as they would signing their mortgage check. Take the time to create a personalized guest book. Make a blurb book, use the wish tree concept or have your guests sign a signature mat. Whatever you do, just give your guests something to do or something special to look at while they sign their names in your guest book. Bring a smile to their faces and their words will bring a smile to yours when you read their words in the years to come.
all pictures by: nicole green. please link back to tying the knot when posting any of these pictures.

Thursday, December 4, 2008

Toss Balls

Remember this picture from yesterday's post?! I just had to find out more about this wedding, originally posted at once wed. Friends, if the old car with the ribbon and tin cans, the quaint white church, and that adorable suitcase carried by the bride wasn't enough to make you fall in love with this wedding, look what's next. Toss balls. Looking for something unique for guests to toss as you exit your church/ceremony venue?! Worried that bubbles will stain your dress (FYI: they didn't stain mine!)? Not wanting to shell out the moolah for real (or silk) rose petals that are a pain to clean up? Toss balls are the answer my friends.
This bride got creative and resourceful. She found acrylic pom pom balls (at any craft store) in her wedding colors, made adorable containers adorned with the name of the bride and groom, tied them with ribbon, and filled them to the brim. Tell me guests wouldn't be delighted to shower you with these?!

Another adorable detail, the four wreaths that hung in the windows of the church. Just delightful.
Check out the wedding via the link above to see more details from this wedding. And let me know if you allow your guests to shower you with toss balls (which would be so easy to clean up afterwords, unlike roses or streamers)!
Pictures by millie holloman

Monday, July 14, 2008

Football Fields of Ribbon

In an effort to explain why I will need 240 yards of ribbon:

Let’s discuss, shall we?!
1. Ribbon streamers I posted about here
2. Roughly one foot of ribbon will be used to bind together each program.
3. The florist stated she needs about 4 yards to wrap the BM bouquets. I rounded up just to be safe.
4. Unsure if we will wrap the GM boutonnieres, but I threw in a foot just for fun.
5. Detail on the invitations to come
6. Please let me explain my vision for the napkins:

(please forgive me, I don't have a credit for this photo. let me know if you know who took this!)

A white napkin folded with a "tuxedo fold" making a little pocket for a card I will (hopefully) soon be designing. I envision it not to be a menu, but more of a card that will detail the events of the reception. More on that later.

7. Each of the 17ish centerpieces will have a thick ribbon wrapped around it with our monogram affixed to the ribbon. (I told you I would be slapping the monogram everywhere…) The small centerpiece vases will be similar to this vase:

hy studio

So. 141+118=259 yards of ribbon. More than 2 football fields. Wish me luck.

Thursday, June 26, 2008

The Laundry List and Addressing the Envelopes

I think I have gone off the deep end. The past two days while at work my thoughts have been consumed with thoughts of how much ribbon I am going to need to order and what invitation design we should go with. At night I come home and sit in front of the computer for HOURS further agonizing over said thoughts that have been bottled up and filed away thorough out the day. While said ideas are bottled up and filed away, they multiply. All of a sudden, before I know it, I have created/dreamed up more projects for myself to do. For example: Clearly I couldn't just address my invitations by hand....that would take hours since I would re-do them all once they begin to look even a smidge crooked. So, I dreamed up the idea of creating a design to use in addressing our envelopes and then printing them out on my printer. Behold:

The back of the envelopes (for the return address) will be stamped with my parent's address via an ink stamp I purchased from expressionery .

Back to business. Please humor me while I share with you our remaining laundry/ to-do list as we have EXACTLY (gulp) 3 months and 1 day until our wedding. Please appreciate the fact that I alphabetized the list for your reading enjoyment.

  • agonize over whether to use the reception hall's standard white card box, or make a fabulous plum one.
  • buy (white) shoes and earrings for the big day in time for next fitting
  • create day of timeline/schedule for the parents, 'maids, and vendors
  • design seating chart for the reception once the RSVPs start coming in
  • enjoy the taste testing at the reception hall. attempt to pick out chicken that doesn't taste like rubber
  • finish invitations...before throwing them out the window
  • get thru the rest of the fittings without letting the alterations lady take me to the cleaners
  • hope the hair and make-up trials go alright
  • investigate that stuff that plugs tear ducts so i don't cry like a baby and ruin my make-up
  • just breathe
  • keep searching for gifts for the bridal party and parents as well as ties and socks for the groomsmen.
  • line up day of transportation
  • make or rent table runners for reception that are the perfect shade of plum
  • notify florist of when we want to see a mock-up of the bouquets
  • order tuxes for the men
  • peruse the mall for beachware for the honeymoon
  • question if i will be able to design the programs myself while staying sane
  • rehearsal and rehearsal dinner time and details still need to be established
  • scrutinize the pros and cons of having either a candy bar, favor boxes filled with chocolate, or no favors at all
  • try to find more things we can slap our monogram onto
  • undertake making a sign to lead our guests from the parking garage to the ballroom where our reception will be held
  • veil needs to be purchased at some point in time
  • welcome bags for out of town guests need to start taking shape
  • x, y, and z are impossible.

Tuesday, June 17, 2008

DIY Bouquet Centerpieces

I love love love this picture taken by jonathan canlas photography:


Gathering a batch of carnations or dahlias and wrapping the stems with colored ribbon would be quite painless. Clustering a couple of the bouquets on a table at the reception produces the above lovely results.
P.S. If you are even thinking about adding a bold punch of yellow into your color scheme then you will do so after seeing this wedding.

Thursday, April 3, 2008

Poll: Poof Balls....or No?

Friends,

By now you all should have seen the planning bio and the married bio of VintageGlam99 on the knot. And you should have visited her bios more than once, drooled over them, and wondered how her wedding could have possibly cost less than $15,000. Because I did.

So I come to you today requesting your help. VintageGlam99 decorated the chairs of her ceremony site with these adorable tissue paper pom poms :
How charming! I love love love them. I haven't blogged about it yet, but I was thinking about letting our ceremony site go bare as far as pew decorations are concerned. The church itself is so radiant and breathtaking that I'm not so sure if it needs any decorations drummed up by yours truly. Here's a picture of our church:


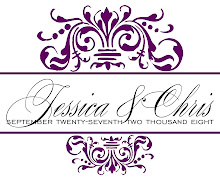
(photo via bobbi + mike)

I would do white pom poms with plum ribbons maybe on every other pew. And here are the pros and cons of the pom pom poof balls, as I see it:

Pros: affordable. super cute. a fun project shared with BMs and a couple bottles of wine on a Thursday night. necessary...i feel like everyone EXPECTS there to be pew decorations.

Cons: one more DIY project. tissue paper decorations that could be considered cheap/tacky. the pom poms might distract from the simple beauty from the church. the pom poms would be in EVERY single picture taken of the church/aisle.

Thoughts? What would you do? Discuss. Vote.

{Voting Update. 41 total votes: love them: 26, not feeling them: 12, undecided: 3}

Wednesday, September 19, 2007

J&C Initials

Today, my dreams came true.

Let me explain. I have been envisioning a DIY project for my reception for about 2 months now. I have been searching high and low and all over the internet for a "J" "&" "C" initials that are 12inches or greater in a brushed silver or white.
So imagine my delight when Sarah from "toast and tables" blogspot pointed me towards one of her recent posts:

http://toastandtables.blogspot.com/2007/08/initial-impact.html

OMG! Made my day!
Back to my DIY project:
The "J" "&" "C" initials will be displayed at the reception. When the guests enter the reception venue they will pick up their escort cards. Attached to the escort card will be a 1/4 inch diameter(ish) white nylon rope about 4 inches long (ala the "tying the knot" theme). Written on the end of the rope in navy permanent marker (in VERY small print) will be the name(s) of the guest..."The Smiths". If the guest(s) are friends of the bride, they will tie their rope in a knot on the "J" initial. Friends of the groom will tie their rope in a knot around the "C" initial. Family members of the bride and the groom will tie their rope in a knot on the "&". After the reception I would like to put the initials into a large shadow box to display in our home and have a visible reminder of the day we "tied the knot" and all of the people that were there to support us.

I am so excited!! Thank you Sarah for your help! Hopefully my paragraph above explains my DIY project somewhat clearly...if not, I hope to have a test run soon for my idea with some pictures!